Posted on Leave a comment

Trace Width vs Length Inductance Table for PCB Traces

I need to know the inductance of the traces I’m creating.  It’s too slow to use the inductance calculator at All About Circuits.   Unfortunately, the equation has any given variable on both the numerator and the denominator.  I refuse to invest the brainpower to develop a rule of thumb, so I’m resorting to a table.  I swiped their equation and tossed in typical values for trace widths  I used in Python.

I wouldn’t use this for anything hyper serious, but if I’m forced to make a 4″ trace, I can quickly see that doubling the width from 0.5mm to 1mm saves me 12nH.

The intuition to be gained from this (and this is probably not a shocker) is that keeping lengths down is a HUGE deal for reducing the inductance of traces.  Trace width is a little more interesting.   In terms of %, you get much better benefit for wide traces at short distances.  At 0.02″, inductance is reduced from 0.171 to 0.075 when switching from 0.01″ traces to outrageous 0.118″ traces.    At distances ~4″,  you go from 136.978nH with tiny traces to 93nH with enormous traces.

I’m using the JLC2313 stackup so the height of these calculations (distance from trace to ground plane) is 0.1mm.

Length: 0.02 in
Width: 0.01 in ( 0.25 mm ) Inductance: 0.171 nH
Width: 0.02 in ( 0.51 mm ) Inductance: 0.128 nH
Width: 0.03 in ( 0.76 mm ) Inductance: 0.104 nH
Width: 0.039 in ( 0.99 mm ) Inductance: 0.09 nH
Width: 0.049 in ( 1.24 mm ) Inductance: 0.08 nH
Width: 0.059 in ( 1.5 mm ) Inductance: 0.075 nH
Width: 0.118 in ( 3.0 mm ) Inductance: 0.075 nH

Length: 0.039 in
Width: 0.01 in ( 0.25 mm ) Inductance: 0.464 nH
Width: 0.02 in ( 0.51 mm ) Inductance: 0.368 nH
Width: 0.03 in ( 0.76 mm ) Inductance: 0.309 nH
Width: 0.039 in ( 0.99 mm ) Inductance: 0.269 nH
Width: 0.049 in ( 1.24 mm ) Inductance: 0.239 nH
Width: 0.059 in ( 1.5 mm ) Inductance: 0.216 nH
Width: 0.118 in ( 3.0 mm ) Inductance: 0.151 nH

Length: 0.197 in
Width: 0.01 in ( 0.25 mm ) Inductance: 3.868 nH
Width: 0.02 in ( 0.51 mm ) Inductance: 3.34 nH
Width: 0.03 in ( 0.76 mm ) Inductance: 3.003 nH
Width: 0.039 in ( 0.99 mm ) Inductance: 2.756 nH
Width: 0.049 in ( 1.24 mm ) Inductance: 2.563 nH
Width: 0.059 in ( 1.5 mm ) Inductance: 2.404 nH
Width: 0.118 in ( 3.0 mm ) Inductance: 1.81 nH

Length: 0.394 in
Width: 0.01 in ( 0.25 mm ) Inductance: 9.107 nH
Width: 0.02 in ( 0.51 mm ) Inductance: 8.04 nH
Width: 0.03 in ( 0.76 mm ) Inductance: 7.354 nH
Width: 0.039 in ( 0.99 mm ) Inductance: 6.85 nH
Width: 0.049 in ( 1.24 mm ) Inductance: 6.452 nH
Width: 0.059 in ( 1.5 mm ) Inductance: 6.123 nH
Width: 0.118 in ( 3.0 mm ) Inductance: 4.867 nH

Length: 1 in
Width: 0.01 in ( 0.25 mm ) Inductance: 27.842 nH
Width: 0.02 in ( 0.51 mm ) Inductance: 25.116 nH
Width: 0.03 in ( 0.76 mm ) Inductance: 23.357 nH
Width: 0.039 in ( 0.99 mm ) Inductance: 22.059 nH
Width: 0.049 in ( 1.24 mm ) Inductance: 21.03 nH
Width: 0.059 in ( 1.5 mm ) Inductance: 20.178 nH
Width: 0.118 in ( 3.0 mm ) Inductance: 16.885 nH

Length: 1.969 in
Width: 0.01 in ( 0.25 mm ) Inductance: 61.566 nH
Width: 0.02 in ( 0.51 mm ) Inductance: 56.187 nH
Width: 0.03 in ( 0.76 mm ) Inductance: 52.715 nH
Width: 0.039 in ( 0.99 mm ) Inductance: 50.148 nH
Width: 0.049 in ( 1.24 mm ) Inductance: 48.111 nH
Width: 0.059 in ( 1.5 mm ) Inductance: 46.423 nH
Width: 0.118 in ( 3.0 mm ) Inductance: 39.876 nH

Length: 3.937 in
Width: 0.01 in ( 0.25 mm ) Inductance: 136.978 nH
Width: 0.02 in ( 0.51 mm ) Inductance: 126.21 nH
Width: 0.03 in ( 0.76 mm ) Inductance: 119.255 nH
Width: 0.039 in ( 0.99 mm ) Inductance: 114.109 nH
Width: 0.049 in ( 1.24 mm ) Inductance: 110.025 nH
Width: 0.059 in ( 1.5 mm ) Inductance: 106.638 nH
Width: 0.118 in ( 3.0 mm ) Inductance: 93.477 nH

Posted on Leave a comment

Smooth Fading LEDs With STM32 Blue Pill on Arduino Platform

The smooth fading of LEDs is possible, but it’s best to have 16 bits to work with and ditch the linear world.

// My code
dutyCycle = pow(1.03, time_increment);

// Math equivalent
y = 1.03^x

Above is the most interesting piece of code today. dutyCycle for this code is a number from 0 – 65535. (16-bit resolution is (2^16 – 1 = 65535).

I have the time_increment set to 10ms. So, basically, we are going to increase the dutycyle by 3% every 10ms. You’ll see below that I settled on 375 steps with each time taking 10ms. By using a time_increment that is set to increase every X milliseconds, it’s easy to control the speed of the fading.

WHY 1.03?

To get the 1.03 value, I worked backward and shot for a ballpark rating of 400 individual steps of brightness. Why? No idea.
After some playing, I figured out that 1.03^375 = 65156. 375 steps works for me. The big rule is we can’t exceed 65535 or the microcontroller will rollover.
To put it another way, 65535 + 1 = 0 in digital land. It’s no different than any other cyclical process. In military time, if you add another minute to 23:59, you get 00:00.
For our purposes, we didn’t want rollover. We want to smoothly fade the LED up to it’s maximum brightness and then back down.

WHY NOT LINEAR?

Much like our ears, eyes have evolved to handle an atrocious level of dynamic range. Such systems play in the world of logs and exponentials (same thing after you flip the graph axis around). It’s one of those scientific marvels that we can make sense of a duty cycle of 65535 and still tell the difference between 500 and 600. In a linear system, we’d have to pick one extreme or the other.

MAKE IT BETTER

It turned out that the dutyCycle code above spent a ton of time in the bottom region. After 50 increments of time, for example, the duty cycle would be 4  (1.03^50 = approx 4). That’s “off” in terms of LED brightness to my eyes. There’s a solution.

Remember that 1.03^375 = 65156. Technically, this wastes a bit of our headroom. We have 65535 to work with and our problem is we are spending too much time down around 0. The lucky fix is to use an offset much like you may have learned (and forgotten) in Alegebra class.

y = mx + b

This is a linear function, but the idea of “b” is the same.  “b” lets us shift our function up our down. We want to shift the whole thing up.   To get our “b” I took 65535 – 65156 to get 379. Let’s just say 375 to be conservative.

// New Code
dutyCycle = pow(1.03, time_increment) + 375;

// Math equivalent
y = 1.03^x + 375.

Now the LEDs do what they are supposed to.  There is not excessive time spent with the LEDs “off”.    So, at time = 0, we end up with a duty cycle of 376. (1 + 375). 376/65535 * 100 = 0.5% actual duty cycle. In reality, this is a brightness of zero. Solved!


#include <Arduino.h>

#define PWM1_pin PA8
#define PWM2_pin PA9
#define PWM3_pin PA10

#define INCREMENTER 100

void CycleA(int pin, int pwm_limit)
{
	int run = 1;
    long timeA = 0;
    int countUp = 1;
    int dutyCycle = 1;
    int time_increment = 0;
    

  while (run == 1)
  {
     
    long currentTime = millis();


    if (pin == 1)
    {
      analogWrite(PWM1_pin, dutyCycle);
    }
    if (pin == 2)
    {
      analogWrite(PWM2_pin, dutyCycle);
    }
        if (pin == 3)
    {
      analogWrite(PWM3_pin, dutyCycle);
    }

    if (currentTime - timeA > 10)
    {
      dutyCycle = pow(1.03, time_increment);
      timeA = currentTime;

      if (dutyCycle > pwm_limit)
      {
        delay(2750);
        //dutyCycle = 1;
        //time_increment = 0;
        countUp = 0;
      }

      if (dutyCycle < 10 && countUp == 0)
      {
        countUp = 1;
        run = 0;
      }

      if (countUp == 1)
      {
        time_increment++;
      }
      else
      {
        time_increment--;
      }
    }
  }
}

void setup()
{

// All PWM pins need to be set as output
// Note:  I've seen multiple examples in which the PWM pins were set to "PWM" instead of "OUTPUT".  I have no explanation for that other than maybe they are using 
// the other guy's STM32-to-Arduino library.
  pinMode(PWM1_pin, OUTPUT);
  pinMode(PWM2_pin, OUTPUT);
  pinMode(PWM3_pin, OUTPUT);
  
  // Change the analogWrite function to operate at 16-bit.  It maxes out at 65535 instead of the 255 of 8-bit.
  analogWriteResolution(16);

}

void loop()
{
 // CycleA(  pin_number,  duty_cycle_limit).
 // This function allows selecting a pin number and sets the duty cycle limit on a scale of 0-65535.
 //  You'll see below that the 10000 for LED Color #1 is there because this was an LED strip that was exceedingly bright.
 //  Basically, the duty_cycle_limit is a brightness limiter.
 
 // I didn't take the time to pass the pin define (PA8, PA9, and PA10) through a function.
 
 // Run LED Sequence for LED Color #1
  CycleA(1, 10000);
  
  // Run LED Sequence for LED Color #2
  CycleA(2, 65000);
  
  // Red LED Sequence for LED Color #3.
  CycleA(3, 65000);
}


Posted on Leave a comment

Microchip 25LC256 EEPROM on STM32 Blue Pill and Arduino

For the big, bad synth project, I needed an EEPROM.  I selected the Microchip 25LC256 from Digikey simply because it had excess capacity (256k) and was thru-hole.   (I always recommend this approach when jumping into a new arena of unpolished prototyping).  I had never worked with external EEPROM before.   It turns out that EEPROM is fairly straight forward.  You pick an address and you write to it.  It’s not all that different from how a file cabinet works.  When you run out of room in one drawer, you move on to the next drawer.  Sometimes you want to put stuff in separate drawers even if they aren’t full.  These”drawers” are known as pages.

The page size in the Microchip 25LC256 is 64 bytes.   At the moment, each preset for my synth requires about 40 bytes, so this means I’m gonna waste 24 bytes per page in the interest of staying organized.  There are many other chips in the 25LCxxx series of varying sizes.  The smaller capacity EEPROM chips use smaller page sizes, which means I’ll need to dedicate multiple pages to each preset.   You’ll see a function to write a 64 byte array to the EEPROM all at once below.  This is significantly faster than writing one byte at a time as there is a 5ms penalty after finishing up the write process no matter if you are writing 1 byte or 64 bytes.

Of course, it took longer than I hoped to effectively use the Microchip 25LC256 EEPROM.  What else is new!    You’ll certainly want to adapt these functions below to suit your needs, but this code does work on an STM32 Blue Pill in PlatformIO using the Arduino framework.  I suspect the critical piece I was missing was slowing down the SPI clock. You’ll see this code uses a clock divider of 16.  According to the datasheet, the larger the Vcc, the faster clock you can get away with.

I’m moving these functions into a dedicated Microchip 25LCxx library which I’ll give away when its ready.  For now, here’s the working code in a rough format.


#include "Arduino.h"

#include <SPI.h>

byte pin_SS2 = PB12;

HardwareSerial Serial3(USART3); // PB11 (RX3)  PB10   (TX3)

void EEPROMsetup()
{
  //SPI_2.begin();
  pinMode(pin_SS2, OUTPUT);
  digitalWrite(pin_SS2, HIGH);
}

byte EEPROMread(uint16_t address)
{
  byte read_buffer = 0;
  digitalWrite(pin_SS2, LOW);
  SPI.transfer(0b00000011);         // Set EEPROM to read mode.
  SPI.transfer16(address);          // Send the 16-bit address
  read_buffer = SPI.transfer(0xFF); // A dummy byte is sent to read the buffer.
  digitalWrite(pin_SS2, HIGH);

  Serial3.print("Reading:  ");
  Serial3.println(read_buffer);
  Serial3.print("Address:  ");
  Serial3.println(address);
  Serial3.println("");

  return read_buffer;
}

void EEPROMwriteByte(uint16_t address, byte value)
{
  digitalWrite(pin_SS2, LOW);
  SPI.transfer(0b00000110); // WREN write enable latch.
  digitalWrite(pin_SS2, HIGH);

  digitalWrite(pin_SS2, LOW);
  SPI.transfer(0b00000010); // WRITE INSTRUCTION
  SPI.transfer16(address);
  SPI.transfer(value);
  digitalWrite(pin_SS2, HIGH);
  delay(5); // Taken from datasheet.  This slows down EEPROMWriteByte a bit, but if a second write is started before the
  // first can be completed, it will ignore the second one.  That's bad.   While the write is in progress, the STATUS register
  // may be read to check the status of the Write-in-process (WIP) bit (Figure 2-6).  I haven't tried that one yet.

  Serial3.println("Write complete");
}

byte EEPROMreadStatus()
{
  byte read_buffer;
  digitalWrite(pin_SS2, LOW);
  SPI.transfer(0b00000101); // Red STATUS register
  read_buffer = SPI.transfer(0xFF); // A dummy byte to read the buffer.
  digitalWrite(pin_SS2, HIGH);
  return read_buffer;
  // Serial3.print("Status:  ");
  // Serial3.println(read_buffer);
  // Serial3.println("");
}

void EEPROMWritePage(uint16_t page_num, byte *save_this_array)
{
  // Pages are 64 bytes.  I'll give each preset a page for simplicity.

  digitalWrite(pin_SS2, LOW);
  SPI.transfer(0b00000110); // WREN write enable latch.
  digitalWrite(pin_SS2, HIGH);
  digitalWrite(pin_SS2, LOW);
  SPI.transfer(0b00000010); // WRITE INSTRUCTION

  SPI.transfer16(page_num * 64); // Send address of page number.  Must start at n * 64.

  for (int i = 0; i < 64; i++)
  {
    SPI.transfer(save_this_array[i]); // WRONG WRONG WRONG WRONG WRONG
  }

  digitalWrite(pin_SS2, HIGH); // close up the write process
  delay(5);                    // See TWC in datasheet https://ww1.microchip.com/downloads/en/DeviceDoc/25AA256-25LC256-256K-SPI-Bus-Serial-EEPROM-20001822H.pdf

  Serial3.println("Page Write complete");

}

void setup()
{
  SPI.begin();
  SPI.setClockDivider(SPI_CLOCK_DIV16); // 72Mhz / 16 = 4.5Mhz
  SPI.setBitOrder(MSBFIRST);

  Serial3.begin(19200); // PB11 (RX)  PB10   (TX)
  Serial3.println("Serial3: 3");
  EEPROMsetup();

  byte preset_arr[64];

  for (int i = 0; i < 64; i++)
  {
    preset_arr[i] = i;
  }

  EEPROMWritePage(0, preset_arr);

  EEPROMWritePage(2, preset_arr);

  // Read Page Two   Page 2 starts at 64*2 and ends at (64*3 - 1)
  for (int i = 128; i < 192; i++)
  {
    EEPROMread(i);
  }

  EEPROMwriteByte(50, 21);
  EEPROMwriteByte(52, 22);
  EEPROMwriteByte(30, 23);

} // end of setup

void loop()
{
  EEPROMread(50);
  EEPROMread(52);
  EEPROMread(30);
  delay(500);
}


Posted on Leave a comment

Backlit Panel Engraving Using CNC – Experiment 001

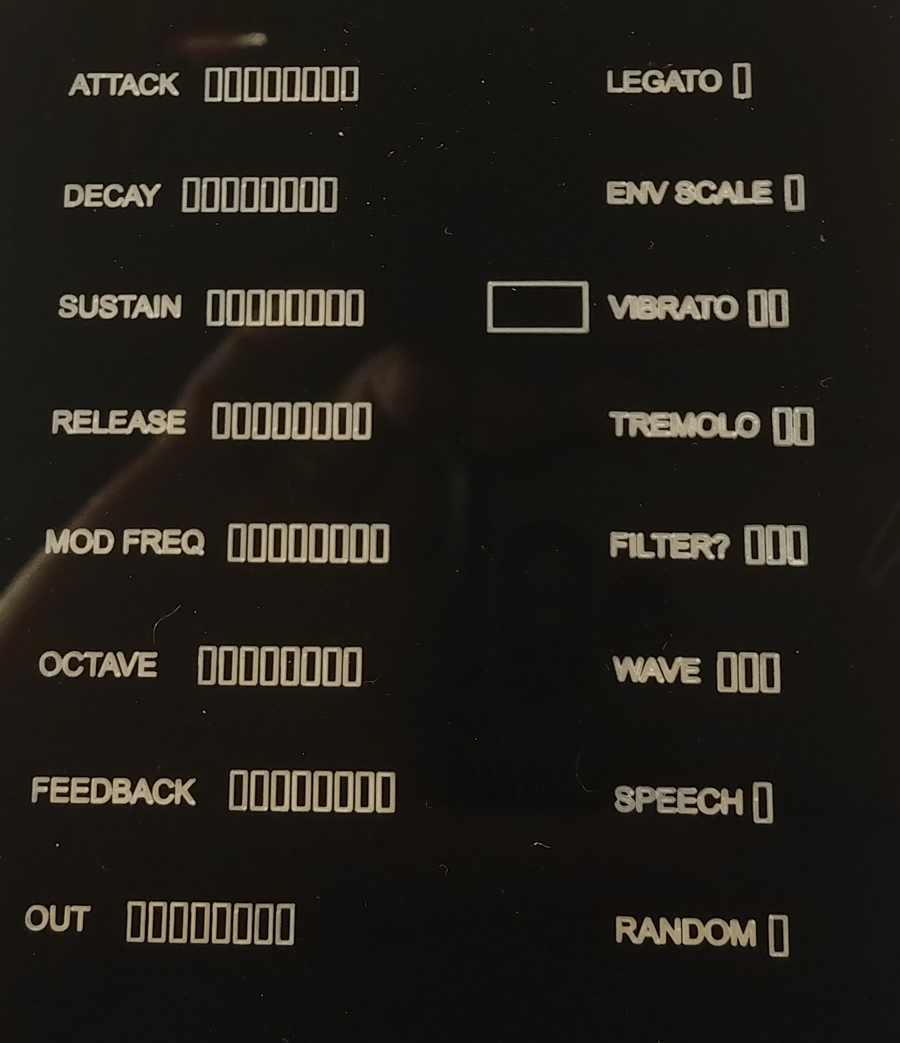
I did some work with the CNC for engraving onto acrylic which I painted black on one side and engraved backward. The idea is the black will ultimately be the back of the front panel. Because the acrylic is very transparent, the engraving is still 100% visible. Because the acrylic is super flat and shiny, it’s as if we put several mm of clear coat or epoxy on top. This epoxy-like effect tends to improve a fairly crude process which is little more than scratching and scraping.

While I should probably start with something easy (NEVER!!!), I decided to jump right into milling extremely small text.  The right call would have been to have engraved a 6″ tall letter A or something equally worthless to me.  Instead, this text 2.159mm tall in Fusion 360.

First off, my conditions.

1) I’m using a bargain-basement 400w spindle-equipped CNC. Engraving puts almost no demands on the rigidity of the machine.

2) I did make a wasteboard using MDF by Facing the top with my CNC. This was a great exercise because it turned out that the machine was highly unoptimized previously and the cut was nowhere near flat. This prompted me to tweak the machine and what I ended up with is light years flatter. I think it’s important to mention this step as the engraving I’m up here is dealing with incredibly low tolerances. If one side is 0.2mm too low or too high, the results will be unusable.

3) I’m using a “nicer” Jerray bit from Amazon with a 0.25mm tip.

The Long Term Goal
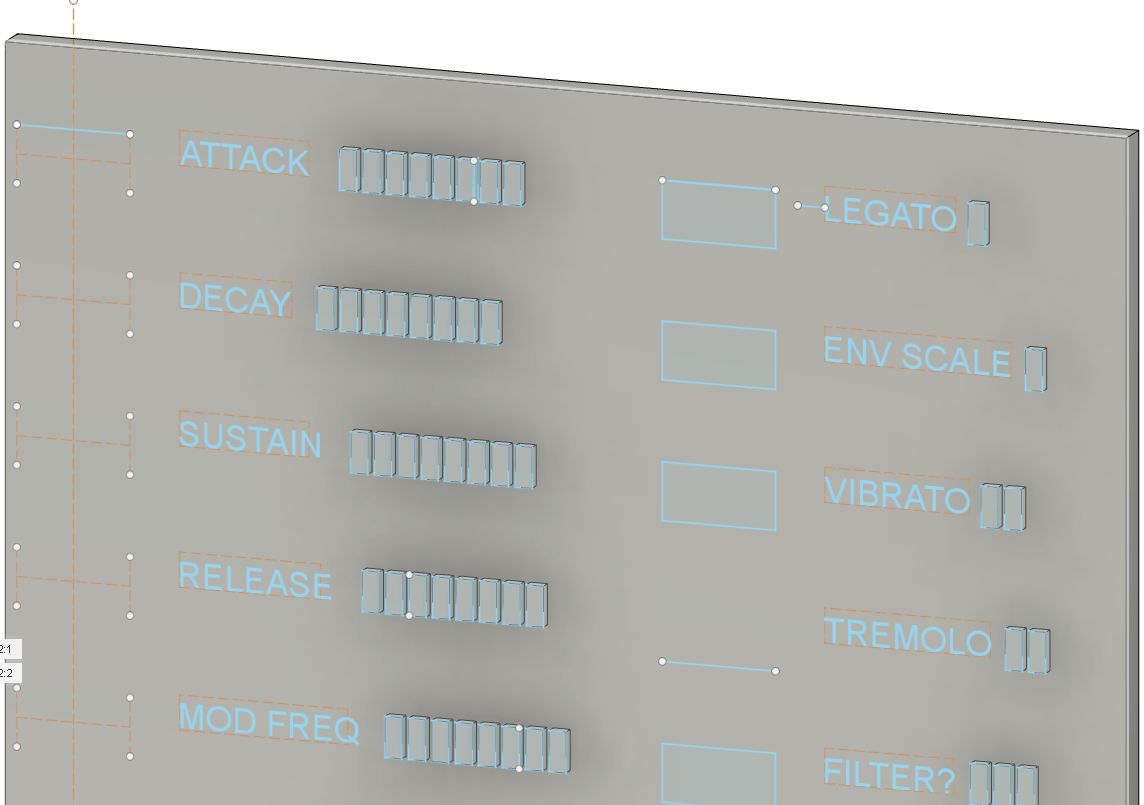
This is a bit abbreviated.  The rectangles to the left of the words are buttons.  The rectangles to the right of the words are LEDs.


Today’s Goal

I don’t particularly love the font I have, but I want to see a real-life version before making any major decision changes.  This is a first-draft type of thing to develop a base of knowledge.  A final product could use any number of technologies to get something closer to what Apple or Samsung may crank out.  For now, I’m just getting my toes wet.  Most importantly, I need to see if the font spacing is acceptable.  It’s impossible to gain any context at all as to what the spacings mean in real-life terms from the computer screen.  Again, this text is 2.1mm tall.  (I measured the small text on the TI-36x calculator and ran with that.)  For now, I need to layout a PCB that will hold 16 buttons and 84 LEDs.  I can’t do that until that rectangle around the text is at a realistic size.


The Process

Take acrylic and put 3 or 4 layers of flat black paint.  I don’t know if it has to be flat.  I used flat black.  Let is dry for 3 months.  I’m not sure how long it has to dry.  I did 3 months.  3 days would probably work just fine.   I set up Fusion 360 to mill backward.  That basically meant a lot of goofing around to be sure that the top of my model was actually the part that was painted black.   It was a little screwy to pull off but I’m still far from an expert in Fusion 360.

Feeds and speeds aren’t a huge deal to engraving (at least compared to milling aluminum or something), but here they are.
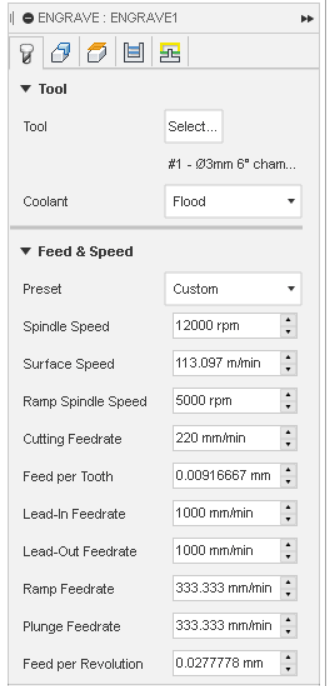
Multiple Depths 0.13mm

Maximum Depth 0.65  (it should be 5 passes)

I swipped the idea of the maximum depth of 0.65mm from a Youtube video:  https://www.youtube.com/watch?v=Va0h5YpRqKE

Here’s the cliff notes.
30-degree engraving bit
maximum depth 0.5mm
220mm / min feed rate
He used a cleanup pass which appears to be an identical, redundant pass
Then a 3rd pass. Max depth 0.65mm.
Then a 4th pass.


My Results

First off, I never got anywhere near 4 or 5 passes.  After 1 pass I was too deep.  I did a test in wood and thought I went too deep on the first pass.  So, I set the Z axis to be 0.2mm too high on the first pass.  As expected, the bit did not make contact with the acrylic on that first pass.  On the second pass, you can see “ANDOM”.   The machine was beginning the 3rd pass on the “R” when I hit stop.  I could tell that R was way too deep and therefore thick.


Areas of Improvement

Again, this is 2.1mm height text.  If I were engraving the Playboy bunny logo at 18″ height or something (interesting, that’s the first thing that popped in my head), I’d probably be content.  It’s clear that any CNC process for letters this small is going to require ridiculously sharp engraving bits.  My Jerray engraving bit doesn’t come across as “ridiculously” sharp.  It has a small tip, but it wasn’t intended to scrape a single atom at a time.

  1.  The easy solution is to get some 0.1mm tip bits. They are amazon.  I’m sure they aren’t the highest quality (whatever that means), but they are a good place to start when looking at proof of concept.
  2. I wasn’t thinking and I used my $10 Z-axis Zeroing tool.  For the record, the only reason I bought a zeroing tool was that I wasn’t happy with the tolerances of using scrap aluminum.  It turns out the one I bought doesn’t have the best tolerances either.  After buying it, I wrote down in my notes to only use it when the height isn’t hyper, hyper important.  Oops.  I forgot about that and used it on so a CNC job where height was hyper hyper important.  I should have used a piece of paper to get the zero.

So, it’s hard to say whether the Z-axis height was a major factor.  I’m thinking it wasn’t, actually.  I  applied the top+0.2mm offset from the beginning to ensure the first pass did nothing.  That worked correctly.  However, the next pass SHOULD have been 0.7mm above the height of the acrylic as I only dropped down 0.13mm .  It wasn’t.  It carved.  It’s possible I goofed up something in Fusion 360 and dropped down more than 0.13mm.  That’s highly probable, actually.  So, it’s up to Matlock to find out how far I actually dropped for the first layer that actually cut.  Assuming I set up Fusion correct, we were less than 0.13mm.  That’s not much room for error.


The Long Term

I think the CNC may be fine for getting a rough idea of what I’m after, but it’s going to get the mega pro results I’ll want in the future.  In particular, this was a One Line Font.  That means it’s ideal for small font engraving on the CNC, but it has no detail to it and certainly isn’t fun.  I had Terminator font yesterday that I vastly preferred, but all the factors of the CNC limit the resolution.  If I want to have real fun with the font, I may have to go with an acrylic and laser cutter combination or maybe some kind of silkscreen option.  (Not sure on either of those yet, btw.)

With all that said, there are those hyper nerds (among the highest compliments a person can receive, btw)  that make fighter jet cockpits. I’ve seen panels engraved with CNC that look damn good.  I can’t say if their design parameters were the same as mine.  Further investigation is required.


Conclusion

If I’m going to use a CNC and I somehow get tighter lettering than this, I still need to space out the letters a bit.   Do I have enough space allocated for text between my button and my LED?  I don’t know.  BLA!  It depends.  I could space out this boring font to something that looks even more boring to improve the CNC results or I could go with Terminator font and a laser….maybe.  (I’m guessing.)  I believe the answer is I need a laser cutter yesterday.  More toys!!  Alright!!!!

Experiment 002

I gave it another try.

1) I used a 0.1mm bit. I measured it as a 9 degrees, but I believe it said 10 degrees on the ad. The bit was a cheapo bit from China and had no brand name I recognized.

2) I set a maximum dropdown of 0.05mm.

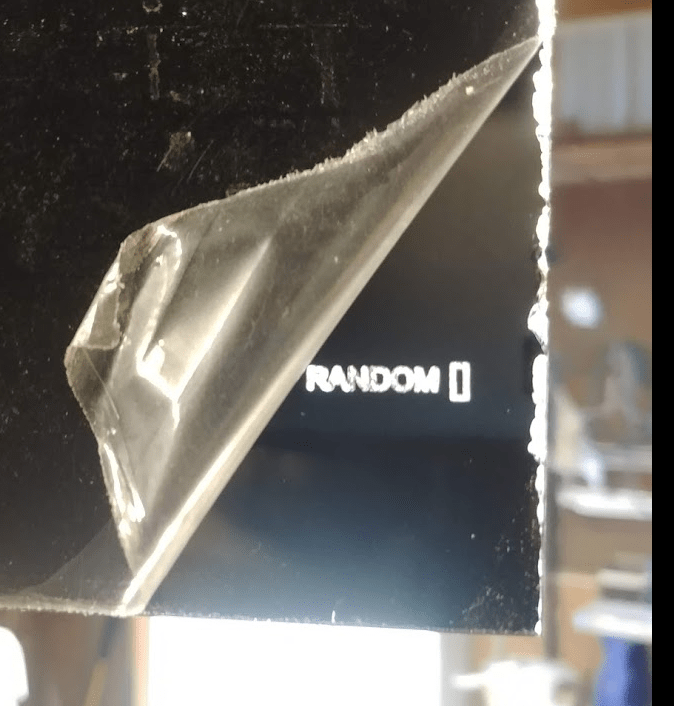
As you can see the results are good. This pic was before I washed the dust out. I wouldn’t say it’s exactly mass-production quality, but it totally suffices for prototyping. Again, the first pass did nothing. The second pass was all that was needed to get the results you see here.  The top is the new one with the 0.1mm bit.  The bottom one is from Experiment 001.

Full Panel

I decided to try milling the entire panel with 16 parameters. Even though I’m using a wasteboard that I leveled to the CNC, there is substantial height variation. Of course, we are talking about hundredths of millimeters here. Using the same maximum dropdown of 0.005mm, I found that the letters closest to where I zeroed the CNC came out great on the first pass. Some lettering didn’t come out until the 5th pass as you can see here.  If you look in the bottom right, you can see that the engraving wasn’t thick enough to cut through the black spray paint.  However, other parameters were cutting uncomfortably deep.
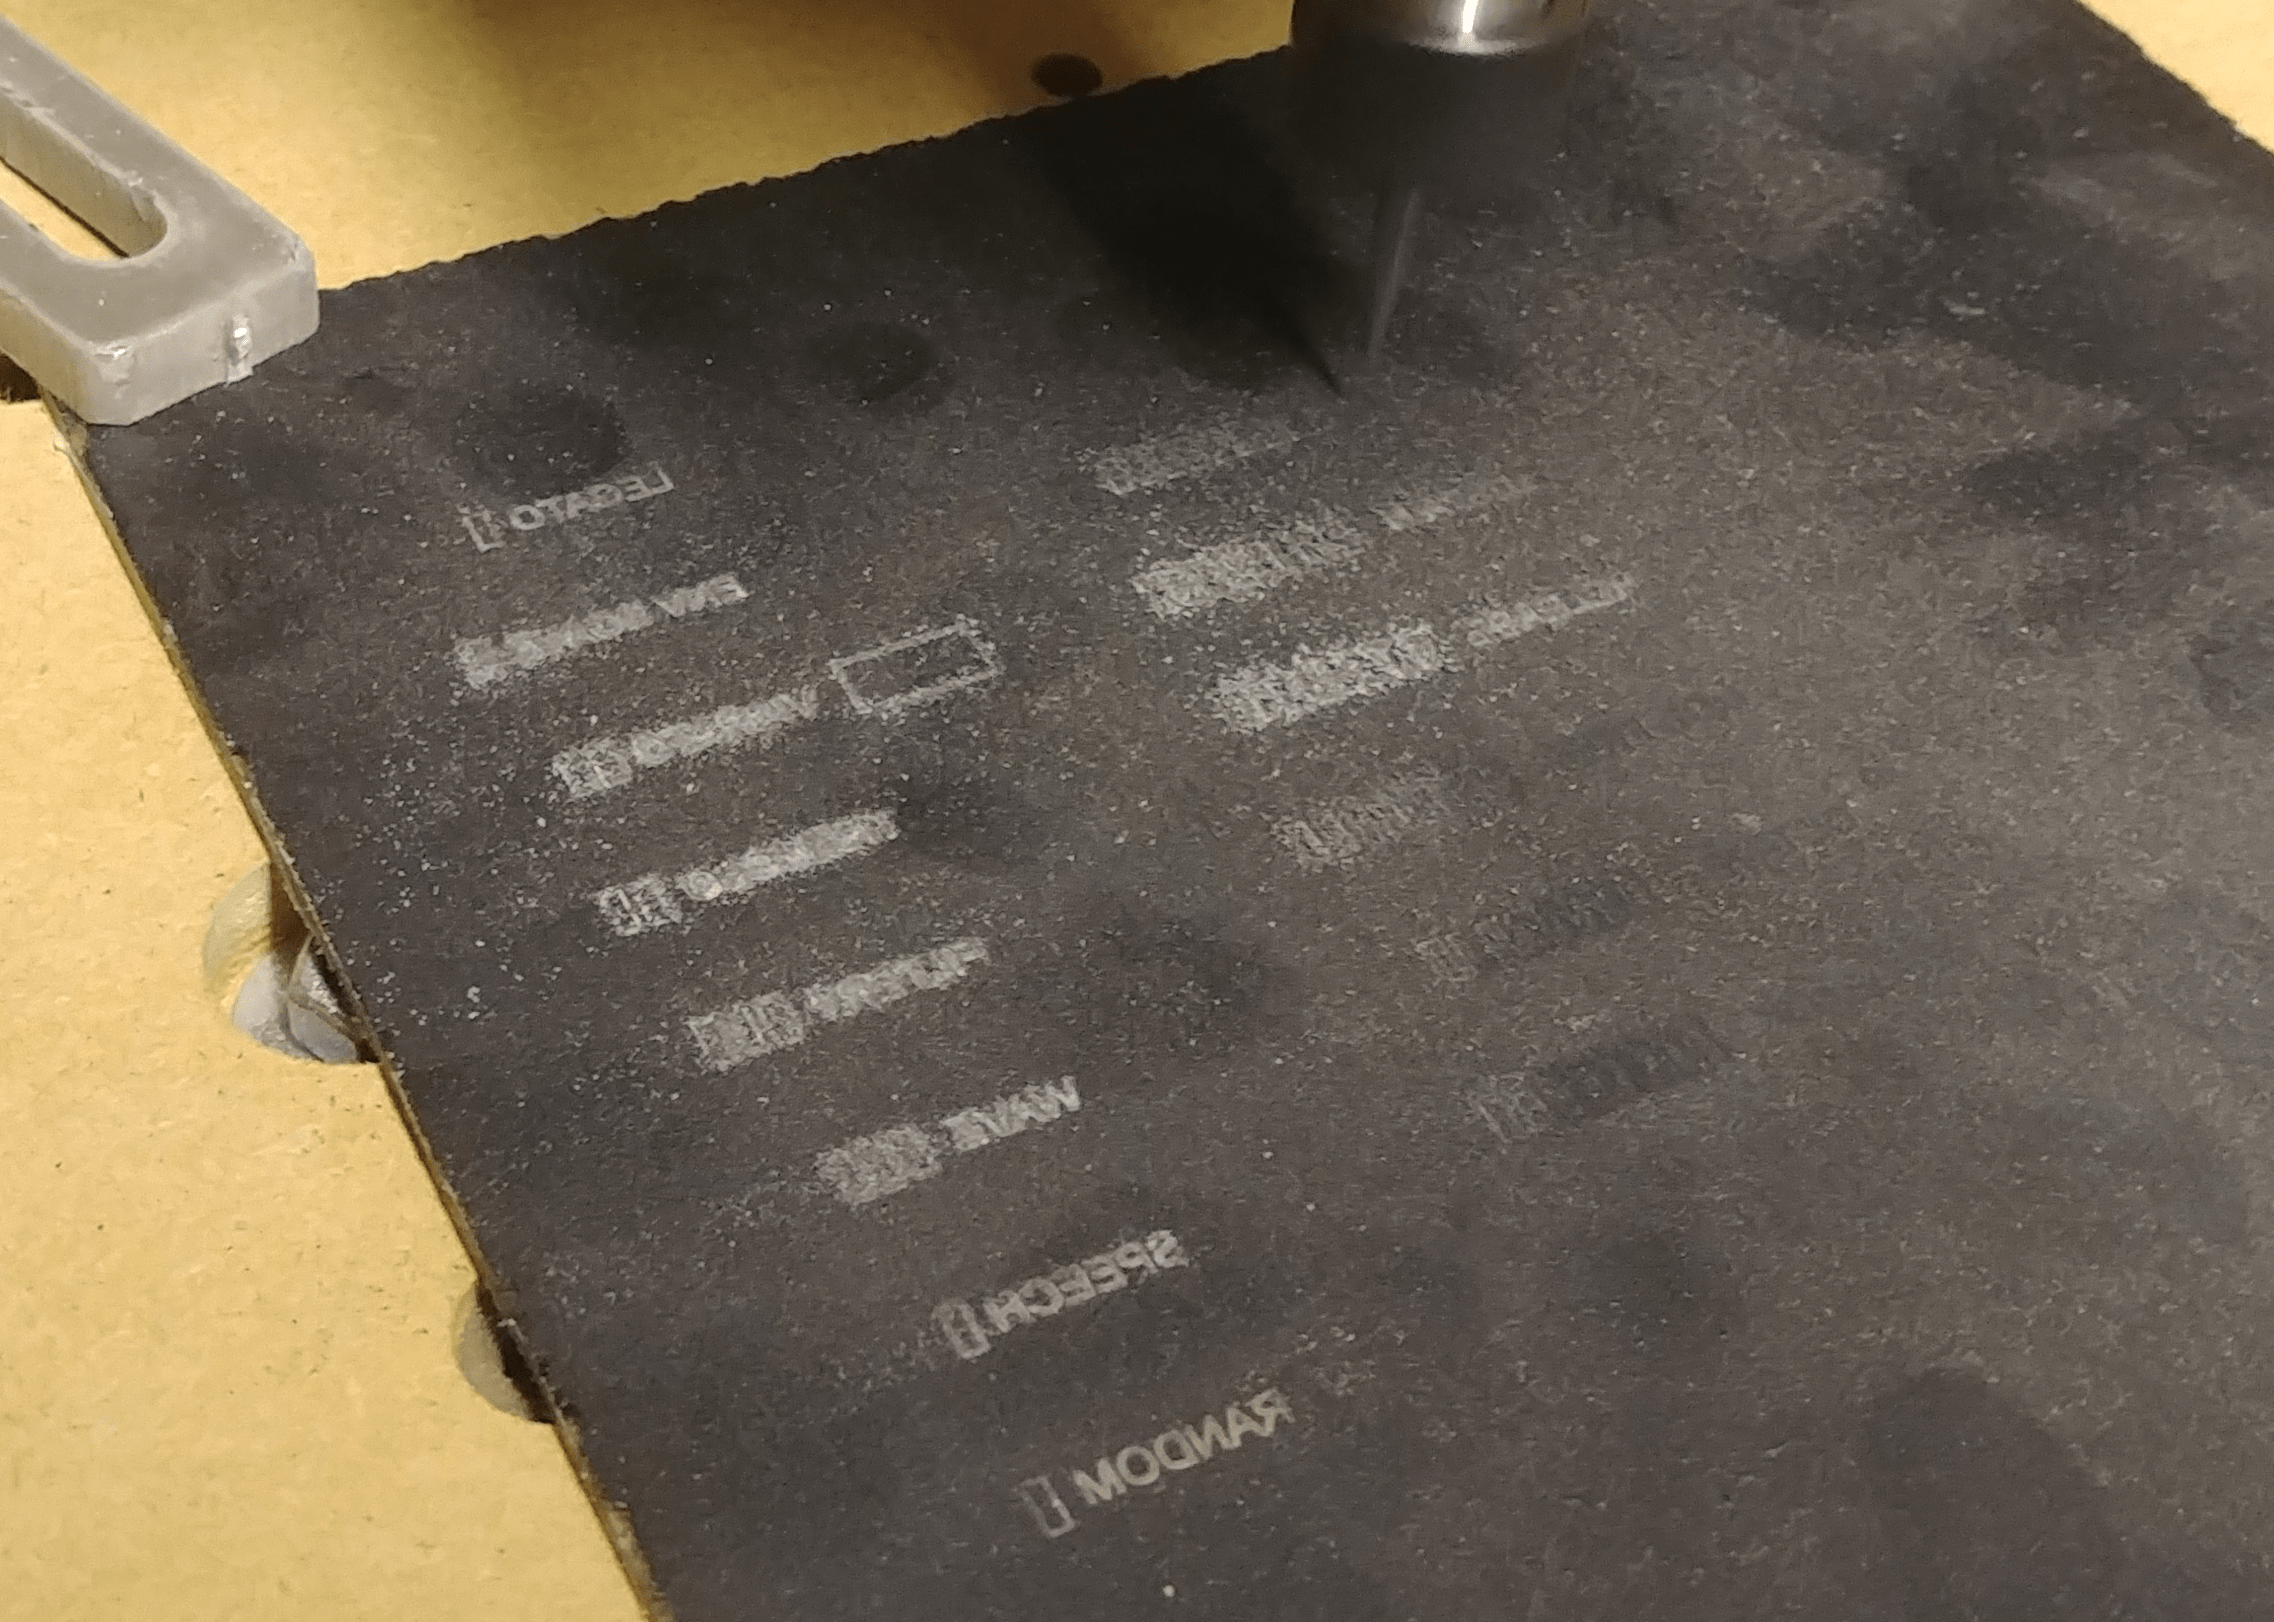
 

Here’s what it looks like after washing the dust off.  The Legato parameter received only one pass.  Tremolo, on the other hand, got hit by many.


Posted on Leave a comment

Multiple MCP23017 Expanders With Interrupts Not Playing Nice

was manually polling my 3 MCP23017 expanders I need for all the buttons for my synth just to get the ball rolling. The serial monitor tells me it was taking almost 5ms….which is similar to the amount of time it’ll take for the dinosaurs to come back. (It’s a billion years in microcontroller land.) I thought making the jump to interrupts wouldn’t be that big of a deal. It was an absolute nightmare. I found a site that really got me going https://www.best-microcontroller-projects.com/mcp23017.html#L2415 , but they pulled a few tricks to account for some goofiness in the I2C’s interrupts. Within their tricks was a 1ms debounce delay. I’ve done my share of debouncing and I immediately did the ol’ nose scrunch to that one. A 1ms debounce is totally non-functional.

My problem was that after an interrupt was triggered on the MCP23017 (causing the 5V to drop to 0V), it was staying at 0V and not being reset. Using the Adafruit library, the method to do that was to simply read the getLastInterruptPinValue(); The problem was I was already doing this and the pin was not resetting back to 5V.

The solution came in realizing that the interrupts in the MCP23017 were continually being triggered by switch bounce. Nick Gammon, the king of everything, has an outstanding tutorial that illustrates this.  He uses no oddball ISR stuff…..just meat n’ taters interrupts. However, he uses a 500ms debounce. That’s a hair extreme, but it sure beats 1ms. I was lucky in that I could wait to call the getLastInterruptPinValue() until I was done doing my work. In fact, I had no need for the value.  All mine are zero.   I was using that function call as an ISR reset. So, I could call getLastInterruptPin(), do my work, put a delay(150) just before the clearing function and everyone is happy.

Even better, I’m using the switches connected to my 3 MCP23017s to update a 16×2 LCD (among other things). I can update the LCD instantaneously. I don’t have to wait at all. In this way, the end-user will never feel my LCD being slow or clunky even though I have delays built-in.  If I wanted to get really cute (and I may) and use an asynchronous delay like the infamous Arduino Blink Without Delay example. Actually, I’ll probably have to do that.

Anyway, here’s the code. I hope it helps.


#include "Arduino.h"


#include 
#include 


#define BUTTON1_INT_PIN PB8
#define BUTTON2_INT_PIN PB9
#define BUTTON3_INT_PIN PA15
#define MCP_INT_MIRROR true // Mirror inta to intb.
#define MCP_INT_ODR false   // Open drain.


/********** NOTES ********************/
Adafruit_MCP23017 button1; // Create an object for the first button board.
Adafruit_MCP23017 button2; // Create an object for the second button board.
Adafruit_MCP23017 button3; // Create an object for the third button board.

volatile byte button1Apushed, button1A_ID_value, button2Apushed, button2A_ID_value, button3Apushed, button3A_ID_value;
volatile byte button1A_ID = 16; // reset to be out of the range of the 0-15 MCP23017 buttons.
volatile byte button2A_ID = 16; // reset to be out of the range of the 0-15 MCP23017 buttons.
volatile byte button3A_ID = 16; // reset to be out of the range of the 0-15 MCP23017 buttons.

// ------------- FUNCTIONS ---------------------------

void button1A_ISR()
{
  button1Apushed = 1;
}

void button2A_ISR()
{
  button2Apushed = 1;
}

void button3A_ISR()
{
  button3Apushed = 1;
}


void setup()
{
  //---------------- BUTTON EXPANDER SETUP ------------------------
  // The address is specified using the A0, A1, and A2 pins
  button1.begin(0b000); // use default address 0, otherwise, the address needs to be defined
  button2.begin(0b001); // make sure to give A0 5V.
  button3.begin(0b010); // Set this up.

  pinMode(BUTTON1_INT_PIN, INPUT); // button1 interrupt pin on ucontroller
  pinMode(BUTTON2_INT_PIN, INPUT); // button1 interrupt pin on ucontroller
  pinMode(BUTTON3_INT_PIN, INPUT); // button1 interrupt pin on ucontroller

  for (int i = 0; i < 16; i++)
  {
    button1.pinMode(i, INPUT); // MCP23017 #1 pins are set for inputs
    button1.pullUp(i, HIGH);   // turn on a 100K pullup internally
    button2.pinMode(i, INPUT); // MCP23017 #2 pins are set for inputs
    button2.pullUp(i, HIGH);   // turn on a 100K pullup internally
    button3.pinMode(i, INPUT); // MCP23017 #2 pins are set for inputs
    button3.pullUp(i, HIGH);   // turn on a 100K pullup internally
  }
  
  button1.setupInterrupts(MCP_INT_MIRROR, MCP_INT_ODR, LOW); // The mcp output interrupt pin.
  button2.setupInterrupts(MCP_INT_MIRROR, MCP_INT_ODR, LOW); // The mcp output interrupt pin.
  button3.setupInterrupts(MCP_INT_MIRROR, MCP_INT_ODR, LOW); // The mcp output interrupt pin.

  // Setup INTs on the MCP23017 button1 for all 16 buttons
  for (int i = 0; i < 16; i++)
  {
    button1.setupInterruptPin(i, FALLING);
    button2.setupInterruptPin(i, FALLING);
    button3.setupInterruptPin(i, FALLING);
  }

  button1.readGPIOAB();
  button2.readGPIOAB();
  button3.readGPIOAB();
  
  attachInterrupt(digitalPinToInterrupt(BUTTON1_INT_PIN), button1A_ISR, FALLING);
  attachInterrupt(digitalPinToInterrupt(BUTTON2_INT_PIN), button2A_ISR, FALLING);
  attachInterrupt(digitalPinToInterrupt(BUTTON3_INT_PIN), button3A_ISR, FALLING);


} // end of setup

void loop()
{

  if (button1Apushed)  // Buttons 0-15 on MCP23017 #1 
  {
    button1A_ID = button1.getLastInterruptPin();
	
	// update LDC here

    button1A_ID = 16;                                                                   // reset to a value that is outside the 0-15 button range of the MCP23017
    button1Apushed = 0;                                                                 // reset the pushed status
    delay(150);                                                                         // strong debounce
    button1A_ID_value = button1.getLastInterruptPinValue();                             // This one resets the interrupt state as it reads from reg INTCAPA(B).
    attachInterrupt(digitalPinToInterrupt(BUTTON1_INT_PIN), button1A_ISR, FALLING);
  }

  if (button2Apushed) // Buttons 16-31 on MCP23017 #2
  {
    button2A_ID = button2.getLastInterruptPin() + 16;


	// update LDC here
	
    button2A_ID = 16;                                                                   // reset to a value that is outside the 0-15 button range of the MCP23017
    button2Apushed = 0;                                                                 // reset the pushed status
    delay(150);                                                                         // strong debounce
    button2A_ID_value = button2.getLastInterruptPinValue();                             // This one resets the interrupt state as it reads from reg INTCAPA(B).
    attachInterrupt(digitalPinToInterrupt(BUTTON2_INT_PIN), button2A_ISR, FALLING);
  }
  if (button3Apushed) //Buttons 32-47 on MCP23017 #3
  {
    button3A_ID = button3.getLastInterruptPin() + 32;
	
	// update LDC here

    button3A_ID = 16;                                                                   // reset to a value that is outside the 0-15 button range of the MCP23017
    button3Apushed = 0;                                                                 // reset the pushed status
    delay(150);                                                                         // strong debounce
    button3A_ID_value = button3.getLastInterruptPinValue();                             // This one resets the interrupt state as it reads from reg INTCAPA(B).
    attachInterrupt(digitalPinToInterrupt(BUTTON3_INT_PIN), button3A_ISR, FALLING);
  }
}